shell scriptでキャリッジリターンが入っている文字列を結合しようとするとなんかおかしい
Gakuです。 ちょっと前にshell scriptを業務中に書く機会があったんですが、すごいハマりを経験したので、その内容まとめておきたいと思います。
キャリッジリターンが入っている文字列を結合すると。。。
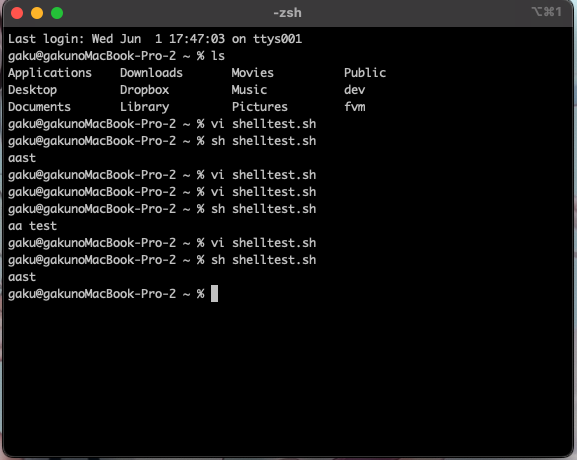
以下のような感じで"\r"のキャリッジリターンが入っている文字列を結合しようとします。
#!/bin/bash

test="test\r"
test2="aa"
echo $test$test2
で、期待結果としてはこんな感じだと思います。
test\raa
でも実際はこうなる。
aast
理由としてはキャリッジリターンが入っていると、カーソルが前に行って、上書きされるようになるみたいです。 なので、
test=`echo "test\r" | tr -d '\r'`
test2="aa"
echo $test$test2
のようにキャリッジリターンを取り除いてあげたりしないと意図した文字列結合になりません。
なんらかのデータをスクレイピングした結果を文字列結合したりするシーンは結構多いと思います。なんか上書きされてる!と思ったら、この現象で発生している可能性が高いです。
知っていればすぐ解決しますが、知らないとドハマリすると思うので、覚えておいて損はないかなと思った次第です。
Gakuからは以上です。
flutterで表示したキーボードを、どこか別のところをtapすれば必ず閉じさせる実装

Gakuです。
flutterで実装してて、有用な小ネタ見つけたので備忘録がてら掲載しておきます。
キーボードの自動開閉について
flutterでキーボード入力を表示したら、他のところをTapしたら自動で閉じたくないですか?
僕は閉じたいです!
なので、巷でよくある以下のような実装を行いました。
return GestureDetector(
      onTap: () => FocusManager.instance.primaryFocus?.unfocus(),
      child: Scaffold(
        appBar: AppBar(
          title: Text('Login'),
        ),
        body: Body(),
      ),
    );

こんな感じで、Button以外の部分をTapすれば良い感じでキーボードを閉じてくれるのですが、ButtonとかをTapしてもキーボードを閉じてくれません。
なので、Listener Widgetを利用して以下のように実装します。
         Listener(
          onPointerUp: (_) {
            FocusManager.instance.primaryFocus?.unfocus();
          },
          child: MaterialApp.router(
            title: 'muscle',
            routeInformationParser: appRouter.defaultRouteParser(),
            routerDelegate: appRouter.delegate(),
          ),
        );
router使っているので、ちょっと違うかもですがMaterialAppをListenerWidgetで囲ってあげて、そこでTapした際、フォーカスアウトするように実装してあげます。
するとこんな感じになります。

入力部以外のところをTapすると必ずキーボードを閉じるようになります。
小ネタでした。
flutterのwidget内for-in文でindexを利用できるようにする
 Gakuです。
簡単なflutterのtipsを掲載します。
Widget内のfor文
Padding(
   padding: const EdgeInsets.only(left: 40),
   child: Column(
     children: [
        for (String value in stringList) Text(value),
     ],
   ),
),
このようにfor文を使えばList内の値をforで列挙できて大変便利です。
ですが、この時に
Padding(
   padding: const EdgeInsets.only(left: 40),
   child: Column(
     children: [
        for ((int index, String value) in stringList) Text(value),
     ],
   ),
),
みたいにindexも表示させたい場面があって、dartはこの構文が使えないのでいろいろ考えてみました。
拡張構文でListを拡張する
dartのExtension構文でListを拡張します。
import 'package:tuple/tuple.dart';

extension IterableExtension<T> on List<T> {
  List<Tuple2<int, T>> get withIndex {
    final list = <Tuple2<int, T>>[];
    asMap().forEach((index, element) {
      list.add(Tuple2(index, element));
    });
    return list;
  }
}
Tupleを利用するのが好きなので、tupleを利用していますが、classで代用しても良いです。
これを定義しておけば、こんな感じでitem1指定でindexをitem2指定で元の値を利用できるようになります。
Padding(
   padding: const EdgeInsets.only(left: 40),
   child: Column(
     children: [
        for (Tuple2<int, String> value in stringList.withIndex)
          Row(children: [Text(value.item1), Text(value.item2)]),
     ],
   ),
),
おわりに
dartのExtension構文でごりごり拡張できるので、不便だなと思った点はどんどん拡張しましょう。
firebase functionsのモジュールインポートでaliasを利用する
 Gakuです。
firebaseのfirebase functionsについて簡単なtipsを掲載したいと思います。
モジュールインポートのaliasについて
firebase functionsはtypescriptを導入し利用しているのですが、import部分で
import * from '../../util/baseComponent';
のようにデフォルト設定だと相対パスでのアクセスとなってしまい、階層が深いと'../'がかなり多くなって、嫌だったので
import * from '@/util/baseComponent';
のようにrootからのパスを@で絶対パスでアクセスできるようになれば楽なのにな〜と思ったので、その設定を入れてみました。
依存追加
npm install --save-dev webpack webpack-cli ts-loader webpack-node-externals
webpack周りを追加して設定していきます。
設定
まずはpackage.jsonでwebpackでbuildできるように設定します。
"scripts": {
    "lint": "eslint --ext .js,.ts .",
    "build": "webpack", // ★これに変更
    "serve": "npm run build && firebase emulators:start --only functions",
    "shell": "npm run build && firebase functions:shell",
    "start": "npm run shell",
    "deploy": "firebase deploy --only functions",
    "logs": "firebase functions:log"
},
firebase functionsのrootフォルダでwebpack.config.jsを作成し、以下のようにビルドの設定を記載します。
const path = require('path');
const nodeExternals = require('webpack-node-externals');

module.exports = {
    mode: 'production',
    entry: './src/index.ts',
    output: {
        filename: 'index.js',
        path: `${__dirname}/lib`,
        libraryTarget: 'this',
    },
    resolve: {
        extensions: ['.ts', '.tsx', '.js', '.json'],
        alias: {
            '@': path.resolve(__dirname, './src'),
        },
    },
    target: 'node',
    module: {
        rules: [
            {
                test: /\.ts$/,
                exclude: /node_modules/,
                loader: 'ts-loader',
                options: {
                    configFile: path.resolve(__dirname, 'tsconfig.json'),
                },
            },
        ],
    },
    externals: [nodeExternals()],
};
これでモジュールインポートでaliasは利用できるのですが、私のIntelliJの環境だとエラーが出たのでIDEでもエラーが出ないようにtsconfg.jsに以下の設定を追加します。
  "compilerOptions": {
    "module": "commonjs",
    "noImplicitReturns": true,
    "noUnusedLocals": true,
    "outDir": "lib",
    "sourceMap": true,
    "strict": true,
    "target": "es2017",
    "baseUrl": "./", //★追加
    "paths": { //★ 追加
      "@/*": ["src/*"],
    }
  },
  "compileOnSave": true,
  "include": [
    "src"
  ]
}
以上です。この設定を行うことで、src/...へのアクセスは、どこからでも'@/...'でアクセスできるようになり絶対パスでモジュールのインポートを行うことが可能です。
おわりに
webpackでモジュールインポートのalias設定を実現しました。 ../がなくなり、utilコードなどへのアクセスが簡単になったので、個人的にかなり満足している設定です。
firestoreでtimestampカラム(createdAt,updatedAt)を自動付与する
 Gakuです。
最近はもっぱら、flutterとfirebaseで開発を行っています。
firestoreはNoSQLということもあって癖がありますが、最近ようやく慣れてきて爆速開発環境でニヤニヤしてます。
(個人開発ならこれくらいの環境でいいんだよ!
そんなfirestoreですが、ソートを実施するためや、リストの制限のために、documentの生成時・変更時にcreatedAtとupdatedAtを必ず付与する設計にしている人も多いのではないでしょうか?
createdAtとupdatedAtカラムをdocumentの生成時に必ず付与するようにしてもいいのですが、firestore ruleでcreatedAtとupdatedAtのルールを毎回付与するのも面倒ですし、
createdAtとupdatedAtがあることによって、upsertなメソッドを記載する時に嫌な書き方になることもあったので、firebase functionで一律で付与する設定にしてみました。
実際のコード
// 一階層目のcreatedAtの自動付与
export const createdCommonProcessNested1 = functions.firestore
    .document("{colId}/{colDocId}")
    .onCreate(async (snap) => {
      await fireStore.doc(snap.ref.path).set({
        createdAt: admin.firestore.FieldValue.serverTimestamp(),
        updatedAt: admin.firestore.FieldValue.serverTimestamp(),
      }, {merge: true});
    });

// 一階層目のupdatedAtの自動付与
export const updatedCommonProcessNested1 = functions.firestore
    .document("{colId}/{colDocId}")
    .onUpdate(async (snap) => {
      if (snap.before.data().updatedAt?._seconds !== snap.after.data().updatedAt._seconds) {
        return;
      }
      await fireStore.doc(snap.before.ref.path).set({
        updatedAt: admin.firestore.FieldValue.serverTimestamp(),
      }, {merge: true});
    });

// 二階層目のupdatedAtの自動付与
export const createdCommonProcessNested2 = functions.firestore
    .document("{colId}/{colDocId}/{subColId}/{subColDocId}")
    .onCreate(async (snap) => {
      await fireStore.doc(snap.ref.path).set({
        createdAt: admin.firestore.FieldValue.serverTimestamp(),
        updatedAt: admin.firestore.FieldValue.serverTimestamp(),
      }, {merge: true});
    });

// 二階層目のupdatedAtの自動付与
export const updatedCommonProcessNested2 = functions.firestore
    .document("{colId}/{colDocId}/{subColId}/{subColDocId}")
    .onUpdate(async (snap) => {
      if (snap.before.data().updatedAt?._seconds !== snap.after.data().updatedAt._seconds) {
        return;
      }
      await fireStore.doc(snap.before.ref.path).set({
        updatedAt: admin.firestore.FieldValue.serverTimestamp(),
      }, {merge: true});
    });
こんな感じでfirebase functionsに記載しておくことでcreatedAtとupdatedAtを自動で付与・更新してくれます。 ポイントとしては
export const createdCommonProcessNested1 = functions.firestore
    .document("{colId}/{colDocId}")
.document("{colId}/{colDocId}")の部分でwildcardを指定することができないため、階層毎にメソッドを定義してあげる必要があります。
(今回の場合1階層目のdocumentと2階層目のdocumentを生成・更新した際にcreatedAtとupdatedAtを更新するようになります。
なので3階層目などで自動付与を実施する場合、別途メソッドを定義してあげる必要があります。
また、update時
documentのupdateを実施する→updatedAtの更新を実施するメソッドを実行→updatedAtの更新を実施するメソッドを実行→・・・∞
というようにupdateを検知してupdatedAtの更新を実施しているので、何もしないと∞ループに陥ってしまいます。 なので
if (snap.before.data().updatedAt?._seconds !== snap.after.data().updatedAt._seconds) {
        return;
}
の部分で、更新時にupdatedAtを更新したか検知し、updatedAtを更新した(上記で定義したupdatedAtの更新メソッドで更新)場合、処理を終了するようにしています。
おわり
以上です。この設定しておけば、createdAtとupdatedAtの概念を考えずに実装できるようになるので、とりあえず設定しておけば幸せになります。
playframeworkでdbマイグレーションツールのEvolustionsを利用する
依存の追加
libraryDependencies ++= Seq(
  jdbc,
  evolutions,
  "org.postgresql" % "postgresql" % "42.2.18"
)
今回はpostgresと接続するためpostgres用のドライバと、evolutionsを利用するための依存を追加します。
databaseの用意
databaseはdockerで用意します。以下のようなdocker-compose.ymlを作成し起動しておきます。
version: '3.1'

services:
  db:
    image: postgres:13.1
    restart: always
    environment:
      POSTGRES_PASSWORD: password
      POSTGRES_USER: user
      POSTGRES_DB: db
    ports:
      - 5432:5432
接続設定
conf/application.confに以下を追加し、databaseとの接続設定を記載します。
db.default {
    driver=org.postgresql.Driver
    url="postgres://user:password@localhost:5432/db"
}
migrationファイルの追加
conf/evolutions/defaultというフォルダを作成し、migrationファイルを作成します。 今回は以下のようなファイルを用意しました。
-- 1.sql
--- !Ups
CREATE TABLE profiles
(
    uid      text,
    nickname text
);

--- !Downs
DROP TABLE profiles;
適用
これでPlayFrameworkを起動すると、このような画面になるので[Apply this script now!]をクリック

Evolutionsを利用して追加テーブルが無事データベースに追加されました。

補足
この状態だと、migrationファイルを追加すると毎回このような画面になって、migrationを追加するか聞かれるので鬱陶しい。

conf/application.confに以下を追加することで、migrationのupもdownもfileを追加すれば自動的に行ってくれるようになる。
play.evolutions.db.default {
    enabled = true
    autoApply=true
    autoApplyDowns=true
}
まとめ
railsのmigrationより個人的には好き。(sqlで書けるし、fileの作成・削除だけで適用してくれるのですごく楽。


